How to Achieve A Swirl-Free Finish While Sanding
By Rachael
Goldsmith
random orbital sander, sanding, woodworking, extreme sanders,
swirl marks, dynorbital, swirl free sanding
Sanding on any surface can be difficult without the right tools or technique. Is there really a
difference in the direction you use a random orbital sander? We believe so and want to help
everyone achieve that perfect finish.
Our Dynorbital Extreme Series line is packed with powerful, yet comfortable, random orbital
sanders. Three (X31), five (X51), and six (X61) inch pads are available with this line – as well as
a new 1-¼" diameter pad, the X125TR.
Since we know a thing or two about sanding, we have compiled a guide for you to follow.
How To Achieve A Swirl Free Finish
-
Check Your Equipment
What do we mean by this? Make sure you are using the right sander for the job. Random
orbital sanders are designed as finishing sanders. Let the tool do the work for you and do not
exert heavy downward force while sanding. This ensures the right finish is left behind when done.
If your application requires a heavy and faster cut rate, use a sander with a 3/8" diameter
orbit. A moderate cut rate would use a 3/16" diameter orbit and the lightest cut rate (and the
finest finish) would use a 3/32" diameter orbit. The best results can be accomplished by
selecting the correct sanding action, using the correct abrasive, and lastly using the correct
sequence of abrasives on the sander.
Check the air pressure at the sander while it is running to ensure that 90 PSIG (6.2 bars)
is the air pressure it is receiving. You may also want to confirm that the tool is running at
the rated "free speed" RPM.
-
Check Your Back-Up Sanding Pad
Remove the back-up pad and rotate the balancer bearing shaft while holding the
counterbalance stationary. The balancer shaft should turn freely. Make sure that the pad is
flat and smooth without any defects. Our Dynabrade pads are "weight-mated" to our sanders to
ensure that there is no excessive vibration.
-
Check Your Abrasive
Abrasive product that has an additive to help prevent loading of the sanding disc will
provide a superior finish than abrasive that has no additive. When sanding particularly
sensitive surfaces such as Corian® and other acrylic solid surfaces, it is best to use a film
backed abrasive sanding disc. Film backing forces the abrasive to lie flat on the surface. The
grain is then presented to the sanding surface in a very uniform manner. Using a good quality
abrasive will greatly improve your overall finish.
-
Use Professional Sanding Techniques
- Always start the sander ON the surface and stop the sander OFF the surface.
- While you are sanding, keep the sander and pad FLAT on the surface. Do not exert too
much downward force, just apply enough force to keep the back-up pad and abrasive flat on
the surface to allow the back-up pad to freely orbit over the surface.
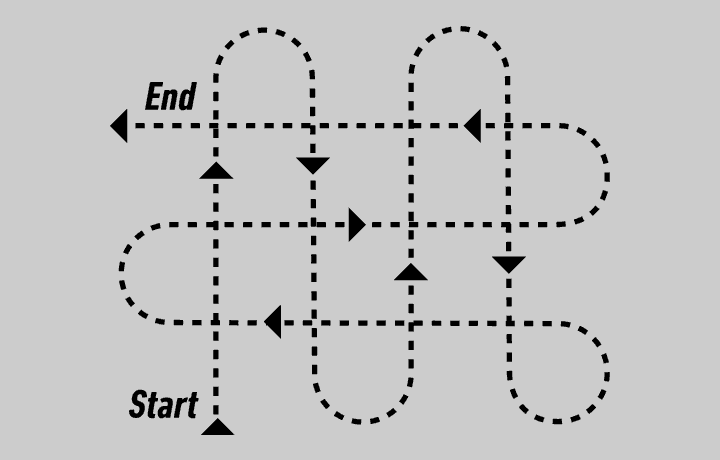
- Follow a pattern while sanding. Many professionals suggest the "North, South, East,
West" pattern where you overlap each pass ¼ the diameter of the back-up pad and abrasive.
This will ensure that the previous scratches are removed and that a uniform finish is
achieved.
- Frequently inspect the abrasive for any tears, folds, or build-up. Before proceeding
onto the next sanding step, always inspect the abrasive.
- If you do notice any abrasive defects, reattach a new abrasive with the same grit and sand the work surface again
before proceeding to the next step.
- Always clear away sanding dust and abrasive debris before progressing to the next
sanding step with a finer "grit" abrasive.
View Extreme Sanders
Contact Us
Share this post